Friday, 11 December 2009

Website table design walkthrough.


Using the Pen tool in Adobe Illistrator i drew out the bare bones of the basic table design, i used the smart guides to get the perspective to look accurate while using the pen tool, i found the best way to draw out the table was to draw each line individually by deselecting it before drawing the next one, that way i could easily edit anything i wanted to without deforming any other parts of the image.


I added the legs one by one and zoomed out to check the perspective of each one systematically as i drew them.


Once i had draw out all of the objects i needed to i made sure i was happy with the design and changed any parts i was unhappy with.


I then opened the brush pannel and selected the artistic water colour brushes as specified by the clients specification and applied them to my table design.
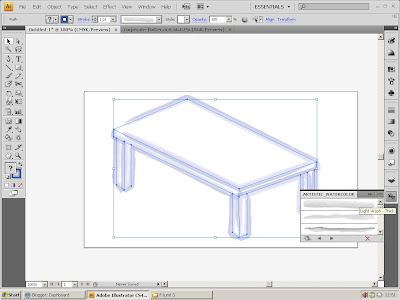


I picked out a water colour brush style that i was happy with and applied it to the table by selecting the whole image then clicking on the chosen brush style.


I then selected the table, held Alt and dragged outwards to create a second identical table, i then changed to a darker colour to make it stand out againts the previous table and selected a thinner water colour brush style and over-layed it with the first table.


Once i had the second table in the correct position over the first one i made sure i was happy with the design and finalsed it by tweeking the colour and small ammount.

Friday, 27 November 2009

CSS labels

Body
H1
H2
H3
P
Wrapper
Content_jumper
Header
Nav
Nav2
Content
Footer

Header:
- Logo
- Slogan

Nav:
- Ul
- Li
- Li A
- Li a.hover
-

Nav2:
- Ul
- Li
- Li A
- Li a.hover
-

content:
- Ul
- Li
- Li A
- Li a.hover
- Table
- Categories
- H2
- H3
- P
- A
- A.hover

footer:
- Ul
- Li
- Li A
- Li a.hover
- H2
- H3
- P
- A
- A.hover


Tuesday, 17 November 2009

Card cuts page design

Index.html

o Html

o Images

o CSS

o Admin


Tasks

Html coding- Aarron

Css coding- Matt, Dan

Illustrations tables - Alex D

Putting photos into AI- Matt, Pete

Exporting webgraphics- Pete

Emailing client- Aarron

Cleaning the text- Andy

Designing page layout- everyone

Choosing a design- everyone

Working with logo- everyone

Each page accessible

1xH1

Menu as list nested with H2

H2

H3

Divs:

Wrapper

Header

Navigation

Content

Footer

HTML

<body>
<div id="contentjumper">
<a href="#content">go straight to content</a>
</div>


CSS

#contentjumper{

Display:none;

}

Tuesday, 10 November 2009

Reserch post

Paper cutting-

http://en.wikipedia.org/wiki/Papercutting

Information about the history of paper cutting and other facts.

http://www.elsita.typepad.com/allaboutpapercutting/

Blog dedicated to paper cutting techniques.

http://www.petercallesen.com/index/A4PAPERCUT_000.htm

Complicated designs for various paper cut sculptures.

No other relevant links

Table ornaments, paper, card-

http://howaboutorange.blogspot.com/2007/12/paper-3-d-holiday-ornament-tutorials.html

Instructions on making various paper ornaments and designs.

No other relevant links

Gifts, enhancement, display-

No relevant links

Craft, cut, paper, card-

http://www.scissorcraft.com/

craft kits and designs for kids.

http://scrapbooking-paper-crafts.suite101.com/article.cfm/5_more_useful_cutting_tools

list of tools needed for making paper cut designs.

http://www.activityvillage.co.uk/chinese_papercut_craft.htm

simple paper design.

No other relevant links